Introduction
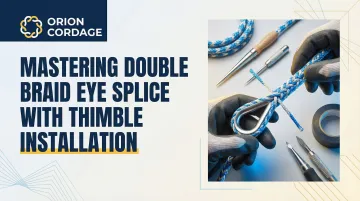
In marine rigging, the double braid eye splice with thimble serves as the gold standard for creating permanent attachment points that protect rope from chafe while maintaining full line strength.
At critical connection points—where rope meets shackles, chain, or hardware—the thimble distributes load evenly and prevents the sharp bends that cause premature failure.
While the concept appears straightforward, executing a reliable double braid eye splice demands precise measurements, systematic marking, and a solid understanding of rope construction. Properly executed splices retain 90-100% of the rope's breaking strength, whereas knots can reduce strength by 50% or more—making splicing the mandatory standard for critical rigging applications.
Key Takeaways
- Produces a permanent, full-strength termination with thimble protection
- Demands precise measurements and specialized splicing tools
- Master four critical techniques: core extraction, crossover creation, tapering, and burying
- Most failures stem from incorrect measurements, skipped tapering, or inadequate crossover burying
How to Complete a Double Braid Eye Splice with Thimble Installation
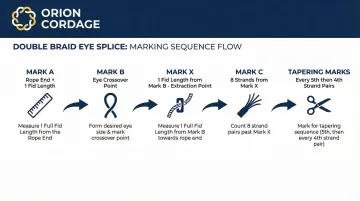
Step 1: Measure and Mark Reference Points
Start by measuring one fid length from the rope end to create Mark A—this becomes your working tail.
A fid length is calculated as 21 times the rope diameter or 7 times the rope circumference, providing the standardized unit for all subsequent measurements.
Form the eye around your thimble, bringing the rope back to create the desired loop size. Where the working end crosses the standing line, mark Mark B. From Mark B, measure one fid length toward the tail and mark Point X—this is where you'll extract the core.
Marking sequence from Mark X:
- Count 8 consecutive cover strands toward the tail and mark Mark C
- Continue marking every 5th strand, then every 4th strand in pairs toward the tail (these marks guide your tapering cuts)
- Tie a slip knot 5 fid lengths from Mark X to secure the rope during splicing and provide an anchor point for milking
Step 2: Extract the Core and Establish Core Marks
Bend the rope sharply at Mark B—this exposes the junction between core and cover. Pinch the cover and slide it back toward the tail, revealing the core beneath.
Pull the entire core out from the cover, extracting it completely from Mark B to the rope end.
Milking the slack:
- Smooth the cover from Mark B toward Mark X, pushing all excess cover slack toward the tail
- This positions Mark 1 precisely where the core exits the cover at Mark B
- Mark the core at this exit point
Core measurements:
- From Mark 1, measure one short fid length (typically marked on your fid tool) toward the core tail and mark Mark 2
- From Mark 2, measure one full fid length plus one short fid length and mark Mark 3
Step 3: Insert Cover Tail into Core
Taper the cover tail by removing the marked strand pairs you created in Step 1. Cut each marked pair flush, working progressively toward the tail to create a gradual taper that reduces bulk by approximately 50%.
Insert your fid into the core at Mark 2, threading it through the hollow core until it exits at Mark 3. Attach the tapered cover tail to the fid and pull it through the core tunnel until Mark T (the last mark on your cover before tapering began) aligns precisely with Mark 2 on the core.
Critical: Tape the crossover point securely where the cover enters the core. This prevents slippage during the next steps and maintains the interlocking structure that gives the splice its strength.
Step 4: Insert Core Tail into Cover
Measure approximately 1/3 fid length from Mark X toward the slip knot and mark Point Z—this determines how far you'll bury the core tail.
Insert your fid at the point where you began tapering the cover (near Mark C), threading it through the hollow cover tunnel. Push the fid carefully past Mark X and exit at Point Z. Avoid snagging the internal core strands that run through the center of the cover tunnel.
Attach the core tail to the fid and pull it through until the core tail emerges at Point Z.
Step 5: Taper the Core Tail
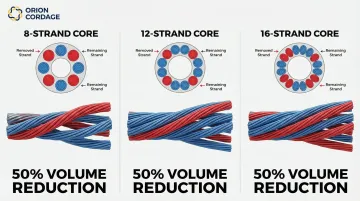
The core requires tapering based on its construction pattern:
- 8-strand cores: Remove alternating strands
- 12-strand cores: Remove every third strand
- 16-strand cores: Remove every fourth strand
Cut and extract marked strands progressively, creating a gradual taper that reduces core volume by approximately 50%. This allows the core tail to disappear smoothly into the cover without creating bulk.
Step 6: Bury the Exposed Components
With both tails tapered, you're ready to bury the splice components into the rope body.
Hold the taped crossover point firmly and alternately pull the cover end and core end to tighten the crossover to approximately rope diameter. This compresses the interlocking point where cover and core grip each other.
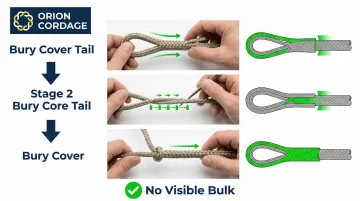
Systematic burying process:
- Bury the cover tail: Smooth the cover from the eye throat toward the crossover, working the cover over the buried cover tail
- Bury the core tail: Milk the cover from the crossover toward Point Z, working in small increments to bury the core tail completely
- Bury the crossover: Milk cover from the slip knot toward the splice, pushing the crossover point deep into the rope body. Flex the rope and tap it with a rubber mallet if needed to loosen fibers and allow the crossover to disappear
The completed splice should show no visible bulk, with all tails and the crossover buried smoothly within the rope body.
When Should You Use a Double Braid Eye Splice with Thimble?
This splice method creates permanent attachment points where rope connects to shackles, chain, wire rope, or hardware that could cause chafe. The thimble protects the rope from crushing and abrasion while distributing load evenly—its bearing surface must be at least twice the rope diameter to maintain full strength.
Ideal applications include:
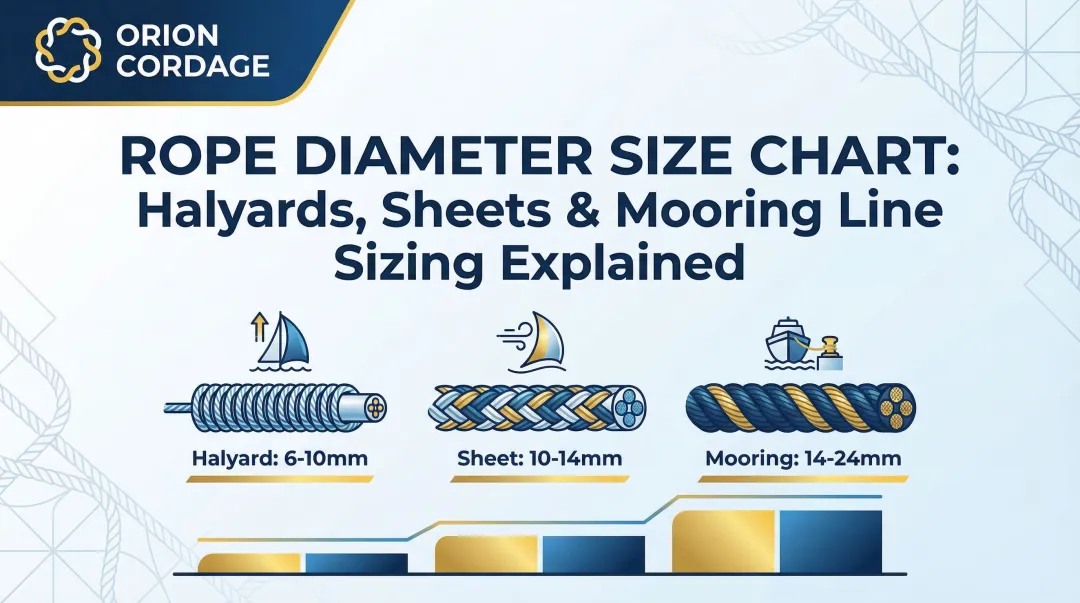
- Halyards and sheets on larger sailing vessels that need low-stretch connections
- Mooring pendants where shock absorption and chafe protection are critical
- Anchor rodes that connect rope to chain
- Towing lines subject to high loads and abrasion
- Standing rigging connections requiring permanent terminations
This splice isn't universal, though. Choose alternatives when:
- Connections need to be temporary or frequently adjusted
- Working with ropes under 1/4" diameter (too small for reliable splicing)
- Using high-modulus fiber cores like Dyneema or Spectra (these require specialized splicing techniques)
- Quick disconnection is operationally necessary
What You Need Before Starting a Double Braid Eye Splice
Tools and Materials
Essential tools:
- Tubular or wire fid sized to your rope diameter (reference manufacturer's fid measurement chart)
- Sharp scissors or knife for clean strand cuts
- Whipping twine or electrical tape for securing crossover points
- Permanent marking pen that won't smudge during handling
- Pusher tool, ice pick, or awl for opening tight braids
Thimble selection:
- Stainless steel (AISI 316 grade) for maximum corrosion resistance in marine environments
- Synthetic thimbles for weight-sensitive applications
- Sized so bearing surface diameter is at least 2× rope diameter
- Choose eared thimbles for applications requiring seizings; standard thimbles for cleaner profiles
Rope Requirements
This splice works exclusively with **Class I double braid** (core-independent) constructions where both core and cover share the load equally. Suitable fiber materials include polyester, nylon, and olefin.
Rope condition matters: UV exposure and wear significantly reduce rope strength. Polyester offers the best UV resistance among common fibers, while nylon degrades faster under prolonged sun exposure.
Start with quality rope in good condition. Splicing worn or damaged rope compromises both safety and performance.
Workspace and Safety Setup
Secure the slip knot to a fixed anchor point (cleat, rail, or workbench attachment) to allow two-handed milking and burying. This provides the resistance needed to smooth cover effectively over buried components.
Workspace requirements:
- At least 8-10 fid lengths of rope laid out straight
- Good lighting to see strand patterns clearly during marking and tapering
- Clean surface to prevent dirt or debris from entering the rope during core extraction
Key Parameters That Affect Double Braid Eye Splice Quality
Three critical variables determine whether your splice maintains rope strength and performs reliably under load.
Fid Length Accuracy
Fid length—calculated as 21 times the rope diameter—determines every subsequent measurement in the splicing process. Incorrect fid length causes misaligned crossover points where the cover enters the core.
When the crossover doesn't align properly, the interlocking grip between core and cover fails. The splice may look complete but will slip under load.
This failure can occur at unpredictable tensions well below the rope's rated strength.
Crossover Tightness
The crossover point (where Mark T on the cover meets Mark 2 on the core) must be pulled tight to about rope diameter before final burying. This compression creates the mechanical interlock that transfers load between core and cover.
Performance impacts:
- Loose crossovers create visible bulges that catch on blocks and hardware, reduce splice strength, and allow slippage under cyclic loading
- Over-tightened crossovers create stiff spots that don't flex naturally with the rope, potentially causing localized stress concentration
- Properly tightened crossovers disappear into the rope body and maintain full strength transfer
Tapering Completeness
Both cover and core tails must be tapered to about 50% of their original volume. This allows tails to disappear smoothly into the rope body without creating lumps or weak points.
Incorrect tapering compromises splice performance:
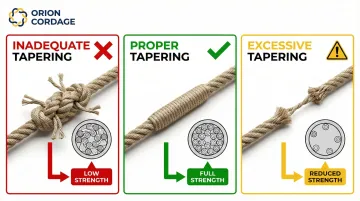
- Inadequate tapering (too few strands removed) creates bulky splices that snag on hardware and look unprofessional
- Excessive tapering (too many strands removed) reduces splice strength by eliminating material needed for load transfer
- Proper tapering allows tails to blend invisibly while maintaining full strength capacity
Common Mistakes When Splicing Double Braid Rope with Thimbles
Even experienced riggers make errors that compromise splice integrity. Avoid these common pitfalls to ensure your eye splice holds under load:
Rushing the marking process Misaligned measurements throw off the crossover point, causing the splice to pull apart under load. Even a few millimeters matters. Measure precisely and mark clearly before proceeding.
Skipping the crossover tape after Step 3 The crossover will slip when you insert the core tail through the cover in Step 4, destroying the interlocking structure. Always secure it with tape or twine before continuing.
Leaving slack before final burying Failing to milk out all slack leaves loose cover between the eye and splice body. This reduces strength, creates an unprofessional appearance, and allows the splice to work loose under cyclic loading.
Inserting the thimble at the wrong time Eared thimbles must go on before Step 3. Standard thimbles should be inserted before the final bury to ensure proper positioning within the eye.
Troubleshooting Issues During Double Braid Eye Splicing
Double braid splicing presents specific challenges that even experienced riggers face, especially when working with ropes over 1/2" diameter or high-modulus fiber constructions.
Core Won't Pull Through Cover Between Marks C and D
Likely cause: Insufficient space in the cover tunnel due to tight construction or large rope diameter.
Solution steps:
- Pull extra core out at Mark B to create visible "pucker" in the cover
- Work the fid slowly, rotating it slightly between cover strands
- Look for natural paths rather than forcing straight through
- Apply steady pressure—the fid should slide, not tear through fibers
Crossover Bunches Up During Final Burying
This typically happens when you're rushing the final smoothing process or the rope body isn't under adequate tension.
Anchor the slip knot securely to a fixed point. Hold the crossover firmly with one hand while smoothing cover from the crossover toward the eye throat with the other hand. Work in small sections—2-3 inches at a time—rather than trying to bury everything in one motion. Patience here prevents having to restart the entire splice.
Cover or Core Tail Won't Disappear Completely
Check these factors in order:
The taper may be insufficient, or you're trying to bury tails before the crossover has tightened properly. Re-check your taper pattern—count the strands you've removed to confirm approximately 50% volume reduction.
Verify the crossover is pulled tight to rope diameter before attempting to bury tails. The rope should feel solid at the crossover, not spongy.
If the taper is correct but tails still won't bury, flex the rope aggressively. Tap it with a rubber mallet to loosen fibers and create space for the remaining tail material.
Frequently Asked Questions
How strong is a double braid splice?
A properly executed double braid eye splice retains 90-100% of the rope's breaking strength. This makes it significantly stronger than knots (which reduce strength by 50-60%).
What types of rope can be spliced using this method?
This method works only for Class I double braid (core-independent) ropes made from polyester, nylon, or olefin. Class II ropes (HMPE/Dyneema cores) and single braid ropes require different techniques.
Does double braid polyester rope stretch?
Polyester double braid has relatively low stretch, typically 3-5% at working loads (20% of breaking strength). This minimal elongation makes it ideal for halyards and control lines where maintaining sail shape is critical.
How long does it take to complete a double braid eye splice with thimble?
Beginners should expect 45-60 minutes for their first splice as they learn to manage core extraction and burying techniques. Experienced riggers complete the process in 15-20 minutes once familiar with the systematic approach.
Can I splice a thimble into rope that's already in use?
You can splice existing rope if you have at least 10 fid lengths from the desired eye location. Worn or UV-damaged rope should be replaced, as degraded fibers won't maintain rated strength.
Do I need to lock-stitch or seize the completed splice?
Lock-stitching is highly recommended for all eye splices and mandatory for ropes 2 inches and larger or critical high-load applications. Stitching through the throat prevents no-load opening where the splice works loose when tension is removed.
About Orion Cordage: Since 1856, Orion Cordage has manufactured high-quality rope and cordage solutions from facilities in the USA and Canada. With expertise spanning industrial, marine, and rigging applications, Orion delivers the durable, reliable rope products professionals depend on for critical connections. Contact Orion's technical team at 877-224-2673 or sales@orionropeworks.com for guidance on selecting the right double braid rope for your splicing applications.