Key Takeaways
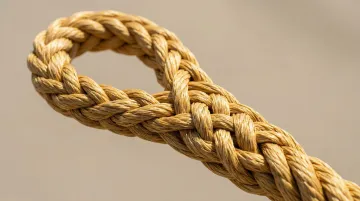
- Creates a permanent loop by weaving unlaid strands back into the standing line
- Takes 4-5 tuck rounds for reliability (6-7 for safety-critical loads)
- Retains 85-95% rope strength versus knots at 50-60%
- Ideal for mooring, anchoring, rigging, and permanent loops
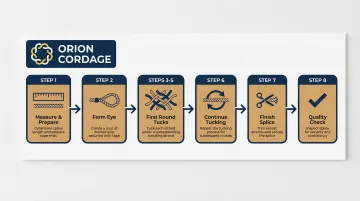
How to Create a Three-Strand Eye Splice: Step-by-Step
These eight steps cover the complete process from preparation to finishing. Taking time on each step ensures maximum strength and reliability.
Step 1: Measure and Prepare the Rope
Count back 16-20 crowns (twists) from the rope end and apply tape at that point. Unlay the three strands back to the tape, being careful to maintain the natural twist in each strand. Tape each individual strand end to prevent unraveling during the splicing process. Optionally, mark the strands as 1, 2, and 3 with a marker for easier tracking.
Step 2: Form the Eye
Form the loop to your desired size, ensuring you follow the natural lay of the rope without forcing a twist. Mark with tape where the eye meets the standing line—this mark guides your first tuck and ensures consistent eye size.
Step 3: Make the First Tuck
Start with strand #1 (the middle strand) and tuck it under the nearest strand on the standing part, just beyond your mark. Working against the lay of the rope, use a fid to open the standing strands if needed for easier insertion.
Step 4: Make the Second Tuck
Take strand #2 and tuck it under the strand immediately to the left of where strand #1 went. It should appear to go "over" the first tucked strand when viewed from the front.
Step 5: Make the Third Tuck (Complete First Round)
Flip the rope over to find the remaining untucked strand on the standing line. Insert strand #3 underneath it to complete the first full round. Remove the tape and tighten all three tucks evenly by pulling each working strand firmly.
Step 6: Continue Tucking (Rounds 2-5)
Once the first round is complete, continue following this pattern for subsequent rounds:
- Each working strand goes OVER the next strand in the standing line, then UNDER the following strand
- Always work right to left (or flip the rope to maintain direction)
- Maintain the natural twist in each strand as you tuck—don't let them unravel
- Keep consistent tension without distorting the rope's lay
Minimum Tuck Requirements:
| Application Type | Minimum Full Tucks |
|---|---|
| General use | 4-5 tucks |
| Critical applications (towing, long-term rigging) | 6-7 tucks |
| Synthetic rope slings (per OSHA) | 4 tucks |
| Manila rope slings (per OSHA) | 3 tucks |
OSHA 1910.184 requires at least four full tucks for synthetic fiber rope slings, while manila rope requires three minimum tucks.
Step 7: Finish the Splice
Trim excess strands close to the rope, leaving a small stub about one strand-diameter long. Optionally, use a lighter or hot knife to carefully melt the strand ends to prevent unraveling, being careful not to damage the standing rope.
Step 8: Quality Check
Inspect that all tucks are uniform and tight. Strands should flow smoothly without crossing, and the splice should taper naturally toward the standing line. Any irregularities indicate the splice should be redone.
Quick Reference Summary:
| Step | Key Action | Critical Point |
|---|---|---|
| 1 | Measure & prepare | 16-20 crowns, tape strands |
| 2 | Form the eye | Mark meeting point with tape |
| 3-5 | First round tucks | One strand under each standing strand |
| 6 | Continue 3-6 more rounds | Maintain twist, consistent tension |
| 7 | Trim & finish | Leave small stubs, optional melting |
| 8 | Inspect | Uniform tucks, smooth taper |
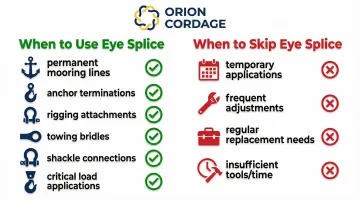
When Should You Use an Eye Splice?
Eye splices aren't always necessary, but become essential when strength, permanence, and reliability are critical.
When Eye Splices Excel
Ideal applications include:
- Permanent mooring lines and dock lines
- Anchor rode terminations
- Rigging attachment points for lifting
- Towing bridles and recovery straps
- Securing to thimbles or shackles
- Any application where knot slippage could be catastrophic
When to Skip the Splice
Eye splices are less practical for:
- Temporary applications requiring frequent changes
- Lines needing regular adjustment
- Rope requiring frequent replacement
- When you lack proper tools and time to splice correctly
Safety standards reinforce these practical considerations. OSHA regulations explicitly prohibit knots in fiber rope slings for lifting applications, requiring splices instead. For industrial rigging and fall protection work, splicing isn't just best practice—it's a regulatory requirement.
What You Need Before Splicing Three-Strand Rope
Having the right tools and rope condition makes the difference between a professional splice and a weak, sloppy one.
Tools and Materials
Essential splicing tools:
- Splicing fid or marlinspike - Opens strands for tucking
- Sharp scissors or rigging knife - Cuts rope and strand ends cleanly
- Masking tape or whipping twine - Secures strand ends
- Lighter or hot knife - Melts synthetic strand ends
- Marker pen - Labels strands for tracking
- Ruler or measuring tape - Measures unlay length accurately
- Thimble (optional) - Protects the eye from chafe when using hardware
Rope Requirements
Use three-strand construction rope in nylon, polyester, or polypropylene. The rope should be:
- Clean and dry (not contaminated with oil, dirt, or saltwater buildup)
- Undamaged with no frayed or worn strands
- Free from UV degradation or chemical exposure
For critical marine and industrial applications, quality domestically-manufactured three-strand rope like Orion Cordage's products ensures consistent lay and fiber quality that makes splicing easier and more reliable.
Orion has been manufacturing rope since 1856, with facilities in the USA and Canada.
Skill and Safety Readiness
Before attempting critical splices:
- Practice on scrap rope first to develop muscle memory
- Understand that improper splicing can reduce rope strength below safe levels
- For life-safety applications, have your first few splices inspected by an experienced rigger
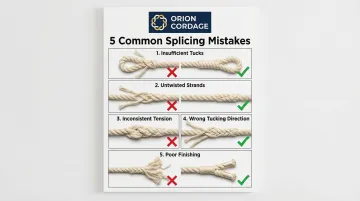
Common Mistakes When Splicing Three-Strand Rope
Most splice failures come from technique errors during the tucking process, not from the splice method itself.
Mistake 1: Not Completing Enough Tucks
A minimum of 4 complete tucks is required to prevent the splice from pulling out under load. Very rough, high-friction manila rope may hold with 3 tucks, but synthetic ropes require the full four.
Research confirms that synthetic ropes need at least four full tucks due to lower friction between fibers compared to natural manila rope.
Mistake 2: Letting Strands Untwist During Tucking
Each strand has a natural twist that must be maintained throughout the splicing process. If strands unravel as you work, the splice loses significant strength.
The working strand should look like a tight, uniform "rope" throughout the tucking process, not a loose bundle of fibers.
Mistake 3: Inconsistent Tension or Crossed Strands
Proper tension is critical for splice integrity:
- Tucks must be snug but not so tight they distort the standing line's lay
- Strands should never cross over each other
- Each tuck should look smooth and even, following the natural spiral of the rope
Mistake 4: Tucking Under Working Strands Instead of Standing Strands
This common beginner error occurs when you accidentally tuck under one of your own working strands instead of the standing line.
Avoid this by always identifying the three strands of the standing line before each tuck—they remain stationary while your working strands weave through them.
Mistake 5: Skipping the Finishing Steps
Not tapering, whipping, or properly securing strand ends leads to unraveling over time, especially in marine environments. Professional splices always include proper finishing to ensure long-term reliability.
Advanced Techniques: Tapering and Whipping
Professional riggers use these techniques to create splices that are stronger, more durable, and less likely to snag or unravel.
Tapering the Splice
After your 4-5 full tucks, create a tapered finish:
- Cut away half the diameter of each strand at an angle
- Tuck once more
- Cut away half again
- Tuck a final time
This gradual reduction in bulk creates a smooth transition that's less likely to catch on hardware and distributes load more evenly. Practical Sailor testing demonstrates that tapered splices resist failure better than non-tapered versions.
Whipping the Splice
Whipping—binding the splice end with small twine—is the mark of professional rope work. This finishing technique prevents even perfectly tapered splices from separating over time, especially under repeated load cycles.
Basic whipping process:
- Form a small loop with twine, leaving the tail end exposed
- Wrap tightly toward the bitter end for 1.5× the rope diameter
- Pass the working end through the loop
- Pull the buried end until the loop disappears
- Trim both ends close
Creating a Thimble Eye Splice
Once you've mastered the basic splice, adding a thimble takes your rigging to professional standards.
Thimbles protect rope from chafe when attached to shackles, chains, or hardware, and are essential for long-term rigging.
Thimble incorporation:
- Place the thimble in the formed loop before the first tuck
- Ensure it stays tight as you complete your tucks
- Finish with whipping to prevent the thimble from working loose
- Verify the thimble is seated firmly with no rotation
Inspection and Maintenance
Regular inspection prevents serious failures in critical applications.
Inspection checklist:
- All tucks should remain tight and uniform
- Inspect strands for damage, chafe, or UV degradation
- No tucks should show loosening or pulling out
- Thimbles must be damage-free and securely seated
When to remake a splice:
- Visible strand damage or fraying
- Tucks that have loosened or begun unraveling
- Shock loads that exceeded the rope's rated capacity
- Rope diameter reduction exceeding 5%
Frequently Asked Questions
What is an eye splice on a rope?
An eye splice is a permanent loop formed by weaving unlaid rope strands back into the standing line. This creates a strong attachment point that retains 85-95% of the rope's original strength—far superior to knots.
What is the strongest knot for a loop at the end of a rope?
A properly made eye splice (not a knot) is strongest at 85-95% strength retention. The bowline is the strongest actual knot at about 60% strength retention.
What is the best rope for splicing?
Three-strand laid rope in nylon, polyester, or polypropylene construction splices most easily. Polyester offers the best balance of strength, UV resistance, and minimal stretch for marine applications, while nylon provides excellent shock absorption for anchor rodes.
How many tucks are required for a strong eye splice?
Minimum 4-5 complete tucks for general applications, 6-7 tucks for critical applications like towing or life-safety rigging. OSHA mandates at least four tucks for synthetic rope slings.
Can you splice wet or dirty rope?
Rope should be clean and dry before splicing. Moisture makes tucking difficult and dirt prevents strands from bedding properly, reducing splice strength.
How do you inspect an eye splice for safety?
Check that tucks are tight and uniform, inspect for strand damage or chafe, and verify no tucks have loosened. Remake the splice if wear, damage, or diameter reduction exceeding 5% is visible.