Introduction
A failed winch line during recovery can turn a routine pull into a dangerous situation. The difference between a secure splice and a weak knot isn't just academic—it's the difference between retaining 90-95% of your rope's rated strength and losing more than half of it.
Properly executed splices maintain nearly full rope capacity, while knots in synthetic lines can reduce strength by 50-80%. For a 3/8" line rated at 20,000 lbs, that's the difference between a 19,000 lb working capacity and just 6,000 lbs—barely enough for a light vehicle recovery.
That's why proper splicing matters for anyone relying on synthetic winch lines.
While splicing may look intimidating if you've never done it, it's a learnable skill that directly improves equipment reliability and reduces replacement costs. This guide walks you through the deep bury splice method, covering required tools, step-by-step instructions, critical success factors, and when professional splicing is the smarter choice.
Key Takeaways
- Achieve 90-95% rope strength retention with deep bury splicing (vs. 50% or less with knots)
- Essential tools: splicing fid (sized to rope), sharp scissors, electrical tape, measuring tape
- Use diameter-dependent bury lengths: 24" minimum for 3/8" rope (not the commonly cited 12")
- Success requires proper taper, adequate bury depth, clean workspace, and undamaged rope
- Skip DIY for commercial operations, warranty concerns, or damaged rope
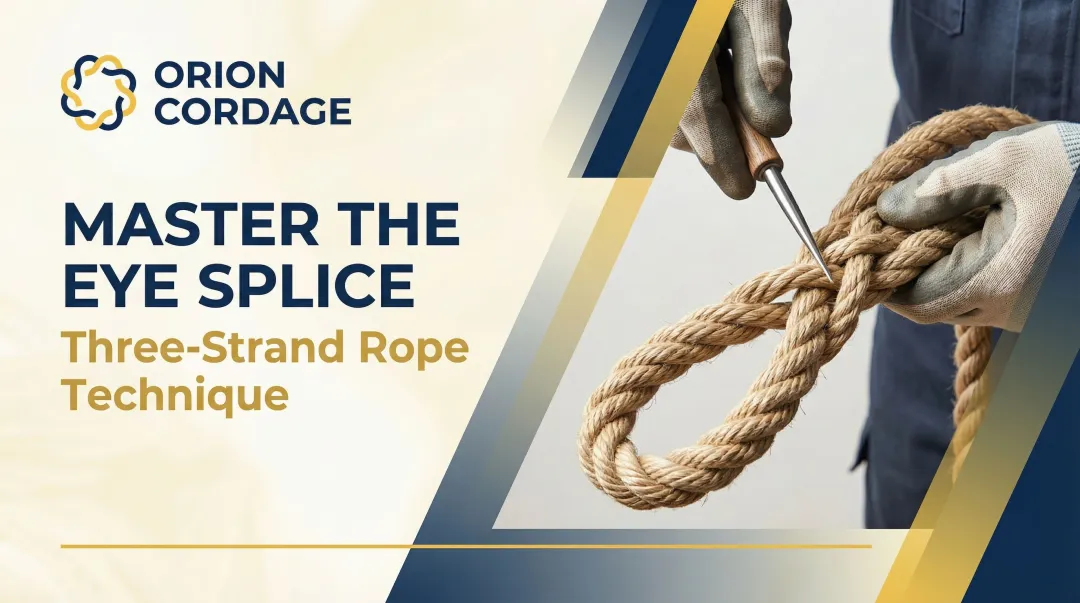
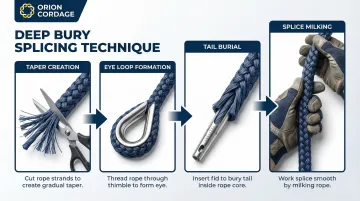
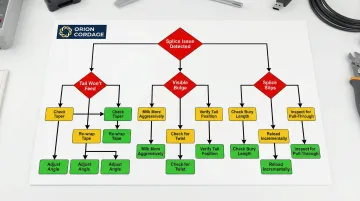
How to Splice a Synthetic Winch Line Using the Deep Bury Method
The deep bury splice works like a Chinese finger trap—tension on the standing line compresses the outer braid around the buried tail, creating a mechanical lock that holds under load.
Step 1: Inspect and Prepare Your Rope
Before you touch a fid, examine your rope thoroughly:
- Check for damage: Look for cut strands, abrasion, glazed (melted) sections, UV fading, or inconsistent diameter
- Verify cleanliness: Dirt trapped inside a splice can reduce strength by 40% by cutting fibers from the inside
- Measure working length: You need 16-24" of tail for 3/8" rope (more for larger diameters)
- Tape the end: Wrap electrical tape 6-8" from the cut end to prevent unraveling
Don't splice rope that shows any signs of damage. Compromised fibers will fail regardless of splice quality.
Step 2: Taper the Rope End
Tapering creates a smooth insertion point and distributes load gradually along the buried section.
How to taper:
- Starting 6-8" back from the taped end, gently pull individual strands from the braid
- Extract 6-8 strands total, spacing them roughly 1" apart as you work toward the end
- Alternate sides to maintain even tapering
- Cut each extracted strand cleanly at its base with sharp scissors
- Re-wrap the entire tapered section smoothly with electrical tape
Testing shows tapered splices are 10% stronger than blunt-end splices, but more importantly, the taper makes insertion far easier.
Once your taper is complete and secured, you're ready to form the eye loop that will connect to your winch.
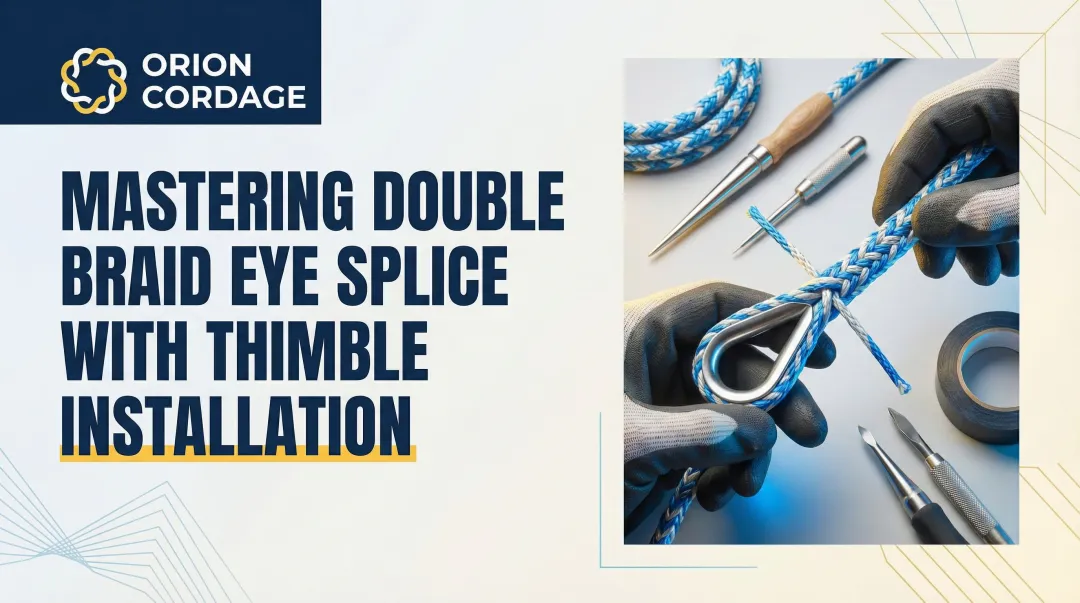
Step 3: Create the Eye Loop (If Using Thimble)
Metal thimbles are essential for winch applications—they protect the rope from abrasion and crushing at the connection point.
Loop formation:
- Thread the tapered end through one thimble hole, around the groove, and back through the opposite hole
- Pull through until you have 16-24" of tail extending beyond the thimble base
- Position the thimble so rope sits properly in the groove without twisting
- Double-check your tail length—too short means starting over
Critical: The tail length you pull through determines your final splice strength. There's no fixing a too-short bury after you start.
Step 4: Bury the Tail Using the Splicing Fid
This is where the splice actually happens.
Burial process:
- Attach tail to fid: Tape the tapered end to your fid with smooth, tight wraps
- Find the core: Work the fid tip between strands at the splice point to find the hollow center
- Insert the fid: Push through the rope's center core for the full tail length
- Exit and remove: Bring the fid out through the rope wall and detach it
- Milk the splice: Slide your hand down the standing line, working the tail completely inside
The buried section should disappear entirely with no visible bumps or bunching. If you see bulges, work the rope more aggressively to distribute the tail evenly.
When Should You Splice Your Own Synthetic Winch Line?
Understanding when to splice your own line versus when to buy pre-spliced rope affects both safety and cost-effectiveness.
Good candidates for DIY splicing:
- Recreational off-road use with non-critical loads
- Replacing worn end loops on personal equipment
- Creating custom-length extensions or secondary lines
- Learning the skill with practice rope before doing production work
Professional and critical applications require different considerations.
When to buy pre-spliced or seek professional work:
- Commercial recovery operations where liability is a concern
- Critical-load applications (industrial, professional towing)
- When rope shows any damage or contamination
- Warranty considerations (DIY splicing may void coverage)
- Insufficient remaining rope length for required bury depth
For professional or critical-use scenarios, starting with factory-spliced rope from manufacturers like Orion Cordage ensures consistent splice quality and eliminates the risk of field errors. Their North American manufacturing facilities produce thousands of rope configurations tested to specification, which matters when liability or mission-critical performance is on the line.
What You Need Before Splicing a Synthetic Winch Line
Equipment and Tools
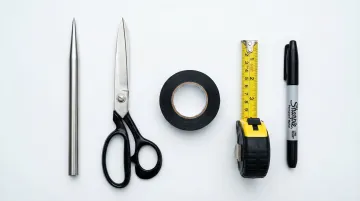
Essential items:
- Splicing fid: Must be sized for your rope diameter (typically tubular or Fast Fid style)
- Sharp fabric scissors or rope shears: Dull blades fray fibers and create weak points
- Electrical tape: For securing ends and creating smooth taper wraps
- Measuring tape: To verify bury length before and during splicing
- Permanent marker: For marking bury points and reference lines
A basic tubular fid works fine, though specialized tools like the Fast Fid speed up the process. For emergency field repairs, some users modify a ballpoint pen as a makeshift fid, though this compromises precision.
Rope Quality and Condition Requirements
Having the right tools means nothing without quality rope. Not all synthetic rope is suitable for winch applications or splicing.
Rope must be:
- Made from HMPE fibers (Dyneema or Spectra) rated for high-load applications
- Rated at minimum 1.5-2x your winch's pulling capacity (industry standard recommends 5:1 safety factor for overhead lifting, though 2:1 is common in recovery)
- Clean, dry, and free from UV damage, abrasion, or contamination
- From a reputable manufacturer with consistent braiding and fiber construction
For a 10,000-lb winch, you need rope with a minimum breaking strength of 20,000 lb. Quality matters—inconsistent braiding or inferior fibers compromise splice integrity regardless of technique.
Safety Knowledge and Workspace Setup
Before you start:
- Understand the technique completely (read through all steps first)
- Work in a clean, well-lit area where dirt won't contaminate the rope
- Know when to abort and start over if you make mistakes
- Review your winch manufacturer's guidelines and warranty terms
Poor lighting increases error rates, while dirt and grit embed in the braid and act as internal abrasives, cutting fibers under load and weakening your splice over time.
Key Variables That Affect Splice Strength and Durability
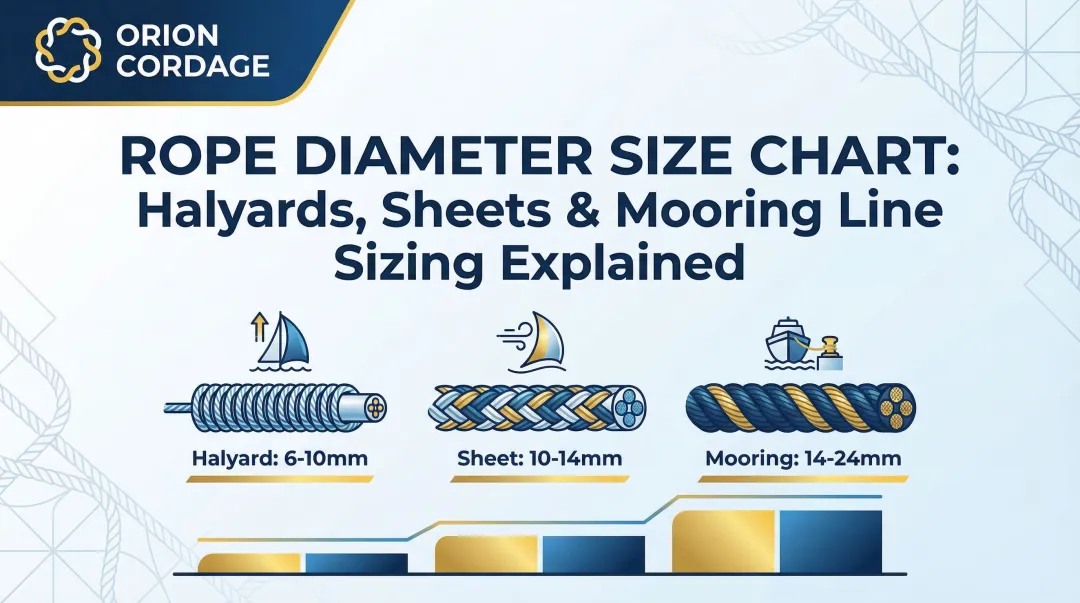
Bury Length (Tail Length Inside the Rope)
This is the most critical factor in splice strength.
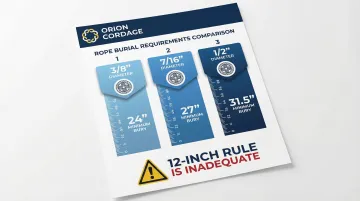
Industry standard bury length is calculated using "fid lengths"—not arbitrary inches. One fid length equals 21 times the rope diameter.
Minimum bury requirements:
| Rope Diameter | Minimum Bury Length |
|---|---|
| 3/8" | 24 inches |
| 7/16" | 27 inches |
| 1/2" | 31.5 inches |
The common "12-inch rule" is dangerously inadequate for anything larger than 1/4" rope. Insufficient bury length causes the tail to slip under load, resulting in catastrophic failure at 50-60% of expected strength. Longer bury (up to 28-32") provides additional security but creates a stiffer section in the rope, so balance strength needs against handling characteristics.
Taper Quality and Smoothness
Proper tapering distributes load gradually rather than creating a hard transition point that concentrates stress. Without it, you'll fight the fid during insertion and create a weak spot that fails prematurely.
Tapering delivers four key advantages:
- Smoother insertion through the rope core with less resistance
- Gradual load distribution along the buried length
- Reduced bulk in the finished splice
- Up to 10% strength improvement over blunt-end bury
The key is removing strands progressively, not all at once. Each extracted strand should be spaced roughly 1" from the previous one, creating a gradual diameter reduction.
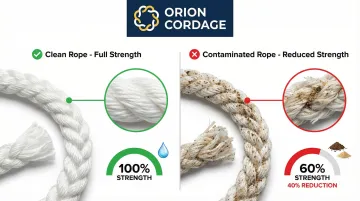
Rope Cleanliness and Fiber Condition
Clean rope isn't just cosmetic—it's structural.
Contamination effects:
- Sand and grit act like sandpaper under load, cutting fibers from inside
- Dirt can reduce breaking strength by 40%
- UV-damaged fibers lose 20-35% strength in just 24 months of sun exposure
- Previously shock-loaded rope has compromised fibers that fail prematurely
If your rope has been dragged through mud, stored in direct sunlight, or subjected to extreme loads, don't splice it.
The compromised fibers will fail regardless of technique quality.
Splice "Setting" Under Initial Load
New splices must be properly set before they reach full strength.
What happens during setting:
- Fibers align and the braid compacts around the buried tail
- The splice may appear to "stretch" 2-4" as construction settles
- This is normal and expected—not a sign of failure
Load the splice incrementally (25%, 50%, 75% of working load) to properly set it. Inspect for slippage or gaps after each loading cycle. Once set, the splice should remain stable through its service life.
Common Mistakes When Splicing Synthetic Winch Line
Even experienced users can compromise splice integrity through common errors. Understanding these pitfalls helps ensure your splice performs reliably under load.
Skipping inspection: Splicing damaged, contaminated, or UV-degraded rope creates a weak point regardless of technique. Always start with rope in good condition.
Insufficient bury length: Using 12" bury on 3/8" rope (should be 24") to save time results in splice failure at 50-60% of expected strength. Always follow diameter-specific guidelines.
Improper milking technique: Pulling too tight creates hard spots that concentrate stress, while insufficient milking leaves loose sections that slip under load. Work the rope firmly but don't force it.
Contaminated work environment: Splicing in dusty conditions or using dull tools that fray fibers compromises long-term strength. Clean workspace and sharp scissors are non-negotiable.
Troubleshooting Common Splicing Issues
Tail Won't Feed Smoothly Through the Rope Core
Likely causes:
- Inadequate tapering or tape wrapping that's too bulky
- Not finding the true hollow centre of the rope
- Fid entering at wrong angle
Solutions:
- Verify taper is gradual with cleanly cut strands
- Re-wrap tape more smoothly if it's bunched
- Try entering the rope at a slightly different angle to locate the core
Splice Creates Visible Bulge or Stiff Section
This usually happens when the tail bunches in one area instead of distributing evenly, or when you haven't milked the rope enough to work the buried section smooth. A blunt-cut tail instead of a tapered one can also create stiffness.
To fix it:
- Work the rope more aggressively with milking motion
- Ensure tail didn't double back on itself during burial
- Verify no twist in the buried section
Splice Slips or Shows Gaps After Initial Loading
Likely causes:
- Insufficient bury length for the rope diameter
- New rope that's too slippery (not yet set)
- Failure to load the splice incrementally
Solutions:
- If bury length is adequate, reload incrementally (25%, 50%, 75% working load)
- Inspect carefully for signs the tail is pulling through
- If slippage continues, cut and re-splice with longer bury
Alternatives to DIY Deep Bury Splicing
Professional Pre-Spliced Winch Rope
Best when:
- You need certified load ratings and documentation
- Warranty protection is important
- Consistent quality matters for commercial use
- You lack confidence in your splicing skills for critical applications
Trade-off: Higher initial cost but guaranteed quality, proper techniques, and often includes professional-grade thimbles and protective sleeves already installed.
For critical applications where failure isn't an option, professionally manufactured rope removes DIY risk entirely. Established manufacturers with decades of experience—like Orion Cordage, producing industrial rope since 1856—provide the consistency and certification that commercial operations require.
Brummel Lock Splice or Eye Splice Variations
Best when:
- You need removable or adjustable connections
- Working with rope configurations that don't suit buried tail splices
- Want the ability to disassemble and reconfigure later
Trade-off: More complex to learn and retains 85-90% strength (vs. 95% for deep bury). However, it offers configuration flexibility that permanent splices can't match.
Frequently Asked Questions
Is splicing a synthetic winch line stronger than tying a knot?
Yes, dramatically so. Proper splices retain 90-95% of rope strength while knots reduce it to 50% or less. HMPE fibers have low friction, causing knots to slip and create stress concentrations that lead to premature failure.
How often should I replace a synthetic winch line?
Inspect before every use and perform detailed inspection every 6-12 months. Replace immediately if you see cut strands, glazed sections, excessive fuzziness, inconsistent diameter, or UV discoloration. With proper care, quality synthetic rope typically lasts 3-5 years.
Can I splice rope that has been previously spliced or repaired?
You can remove an old splice and create a new one on undamaged rope if sufficient length remains for proper bury depth (24"+ for 3/8" rope). Never splice rope with multiple repair points, visible fiber damage, or insufficient length. Each splice consumes rope length, so eventually you'll need replacement rope.
What's the difference between deep bury splice and brummel lock splice?
Deep bury is simpler and stronger (95% strength retention) but creates a permanent connection. Brummel lock uses interlocking loops that can be disassembled if needed but requires more skill and typically retains 85-90% strength. For winch lines under high tension, deep bury is optimal.
Do I need to use a thimble in my splice, or can I create a soft eye?
Thimbles are essential for winch applications. They protect against abrasion and crushing at the connection point, especially critical for repeated loading cycles. Thimbles also maintain proper bend radius, preventing the rope from flattening under load and stressing fibers unevenly. Soft eyes are acceptable only for light-duty or temporary applications, or when connecting to soft shackles rather than metal hardware.
How can I test if my splice is strong enough before using it in a recovery situation?
Load the splice incrementally to working load limits (not breaking strength)—start at 25%, then 50%, then 75% of your winch capacity. Inspect visually for slippage or deformation after each loading cycle. The splice should set without the tail pulling through or gaps appearing. Proper technique verification through incremental loading is safer than destructive testing of your actual recovery equipment.