Introduction
Replacing a damaged dock line with a pre-made assembly can cost $80 or more, and you're stuck with fixed lengths that rarely match your slip dimensions perfectly. Learning to splice your own thimble connections solves both problems while creating a stronger attachment point than any knot.
A properly spliced thimble maintains 90-95% of the rope's original strength, far outperforming knots that reduce rope strength by 30-50%. While the process may look complex at first, anyone can master this skill with the right guidance and basic tools.
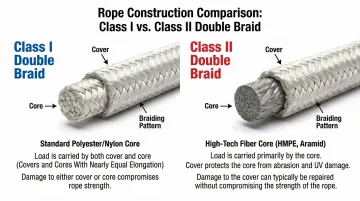
This guide focuses specifically on Class I double braid rope—the type where core and cover share the load equally, commonly used in marine dock lines.
You'll learn what tools you need, follow clear step-by-step instructions, and discover how to avoid common mistakes that compromise splice strength.
Key Takeaways
- Splicing a thimble into double braid dock line creates a permanent, strong loop that protects rope from chafing at connection points
- You'll need a splicing fid sized to your rope, tape, scissors, a marker, and 45-60 minutes for your first splice
- The splice buries cover and core into each other with proper tapering for maximum strength
- Success depends on accurate marking, maintaining proper tension, and following the correct burial sequence
How to Splice a Thimble into a Double Braid Dock Line: Step-by-Step Instructions
This splice works for Class I double braid rope—polyester, nylon, or olefin construction where core and cover share the load equally.
If you have Class II rope with high-tech fibers like Dyneema or Spectra, consult manufacturer instructions as the technique differs significantly.
Step 1: Measure and Mark the Rope
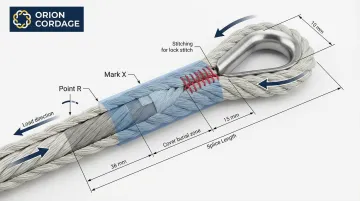
Tape the rope end with one thin layer of vinyl electrical tape. Measure back one fid length from the end and mark as Point R (Reference Point).
Form your desired eye size around the thimble and mark where the standing part meets as Mark X—this is where you'll extract the core. Measure 5-6 fid lengths from Mark X toward the standing end and tie a slipknot to secure the rope during splicing.
Step 2: Extract the Core and Create Initial Marks
At Mark X, bend the rope sharply and use your fid to spread the cover strands. Extract the entire core from inside the cover, then tape the core end.
Slide the cover toward the slipknot and back again to remove slack. Mark where the core exits the cover as Mark 1.
Create your measurement marks:
- From Mark 1, measure one short fid section toward Mark X and mark as Mark 2 (two marks around the core)
- Measure one full fid length plus one short section and mark as Mark 3 (three marks around the core)
Step 3: Prepare the Cover Taper
Starting at Point R, count 8 consecutive strands that spiral in the same direction. Mark the 8th strand completely around the cover as Mark T.
From Mark T toward the rope end, mark every 5th strand pair (left and right)—these marks indicate where you'll taper the cover by removing strands later.
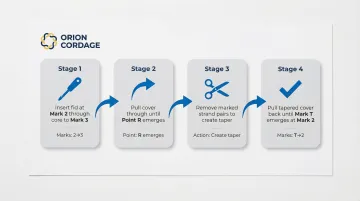
Step 4: Bury the Cover into the Core
Insert your fid into the core at Mark 2, push it through the centre of the core, and exit at Mark 3. Attach the taped cover end to the fid and pull it through until Point R emerges at Mark 3.
Starting from the rope end, pull out and cut each marked strand pair from the cover until you reach Mark T—this creates a gradual taper. Pull the tapered cover back through the core until Mark T emerges from Mark 2, then tape Mark T and Mark 2 together to secure the crossover.
Step 5: Bury the Core into the Cover
From Mark X, measure 1/3 fid length toward the slipknot and mark as Point Z.
Insert the fid at Mark T (where the tapered cover enters), attach the taped core end to the fid, and push through the cover tunnel past Mark X, exiting at Point Z.
Pull the core tail at Point Z until you can mark where the core exits. Cut the excess core at the Point Z mark.
Taper the core by removing strands based on your rope's construction:
- 8-strand core: Remove 4 consecutive strands
- 12-strand core: Remove every 2nd strand for 3 strands total
Step 6: Final Bury and Lock Stitch
Hold the rope at the slipknot and milk (slide) the cover toward the splice. The cover should slide over Mark 3, Mark 2, and the crossover at Mark T until Point R meets Mark X.
Insert your thimble into the eye and ensure it fits snugly.
Lock stitch the throat of the splice by passing whipping twine through the spliced area at least 3 times on each side, rotating 90° halfway through. Tie off and bury the knot between cover and core to prevent the splice from opening under no-load conditions.
What You Need to Get Started
Having the right tools makes splicing significantly easier, and most tools are reusable for future projects.
Tools and Materials
Essential splicing tools:
- Splicing fid sized appropriately for your rope diameter (tubular fids work best for double braid)
- Scissors or sharp rigging knife
- Vinyl electrical tape or masking tape (avoid duct tape—it's too thick)
- Permanent marker
- Whipping twine
- Lighter or small torch for melting rope ends if needed
Hardware:
- Stainless steel thimble (316 SS) sized to fit your rope diameter—sizes range from 1/4" to 1" rope diameter
The Right Rope
This splice technique works only with Class I double braid rope where the braided core and braided cover each carry about 50% of the load. Common materials include polyester (like Orion's premium double braid dock lines), nylon, and olefin.
Why the Class I distinction matters: Class II ropes with high-modulus fibres (Dyneema, Spectra) need completely different splicing techniques. The core carries 100% of the load and requires longer burial lengths. Using the wrong technique will result in splice failure.
Workspace Setup
Workspace requirements:
- 8-10 feet of clear working space
- Fixed anchor point (cleat, fence post, or vice) to maintain tension during final steps
- Well-lit area for precise measurement and marking
Time estimate: Plan for 45-60 minutes for your first splice. Experienced splicers complete the process in 20-30 minutes.
Common Mistakes and How to Avoid Them
Most splice failures occur from rushing the process or skipping steps rather than lack of skill.
Watch Out for These Common Errors
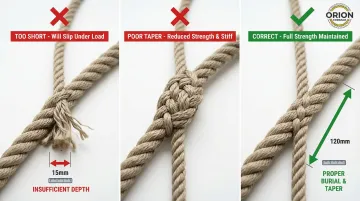
Incorrect fid length measurements lead to burial depths that are too short or too long. Always use the fid length chart specific to your rope diameter and double-check all marks before cutting.
Insufficient burial length reduces splice strength to 60-70% instead of the target 90-95%.
The second mistake involves improper tapering. When you fail to taper the cover and core tails correctly, you create a bulky splice that won't run smoothly through blocks or chocks. Remove strands gradually as marked and ensure tapered ends disappear completely when buried.
Snagging internal core strands happens frequently when pushing the fid through the cover between Mark X and Point Z. To avoid this:
- Work slowly and check progress frequently
- Pull the exposed core at Mark X to confirm it slides smoothly
- If you feel resistance, back the fid out and reposition before continuing
Tips for Successfully Adding a Thimble
Thimbles serve a critical function: they prevent the rope from point-loading on a shackle bail or chain link, which would cause premature wear and failure at the eye.
Without a thimble, the rope will eventually break at the connection point. Follow these guidelines to ensure proper thimble installation:
- Size your eye loop to fit snugly — The thimble should sit firmly inside the eye with minimal gap. If too loose, it will shift and cause uneven wear; if too tight, it creates stress points.
- Insert at the right stage — Add the thimble AFTER completing the core burial (Step 5) but BEFORE the final burying step (Step 6). This timing lets you position the thimble properly while still adjusting eye size by milking the cover.
- Check for smooth seating — Once inserted, the thimble should follow the natural curve of the eye without forcing the rope into an unnatural shape.
Frequently Asked Questions
What's the difference between Class I and Class II double braid rope for splicing?
Class I rope (polyester, nylon, olefin) has core and cover sharing load equally, using standard splicing. Class II rope has high-tech cores (Dyneema, Spectra) carrying 100% of load and requires specialized techniques not covered here.
Can I splice double braid rope without a fid?
Yes, you can use a taped pencil, wire coat hanger, or knitting needle as a makeshift fid, but the process will be slower and less neat. A proper fid's smooth taper navigates tight braids more efficiently.
How strong is an eye splice compared to the rope's rated strength?
A properly executed double braid eye splice retains 90-95% of the rope's original breaking strength, which is significantly stronger than any knot. Most knots reduce strength by 40-50%.
How long does it take to splice a thimble into a dock line?
First-time splicers should plan for 45-60 minutes, while experienced splicers complete the process in 20-30 minutes. This compares favourably to professional splicing costs of $50-150 depending on line specifications.
Do I need to lock stitch the splice or can I skip that step?
Lock stitching is strongly recommended because it prevents the splice from opening under no-load conditions (when the line is slack), takes only 5-10 additional minutes, and significantly extends the splice's service life.
Can I use this same technique for halyards and sheets?
Yes, this Class I eye splice works for halyards, sheets, and anchor rodes. Lines running through blocks need extra attention to taper smoothness to prevent snagging.